Understanding the POS/checkout screen
A tour of YAZZY OS's checkout screen — the cart, the product browser, and the action bar.
Go to Sales POS to open the checkout screen — this is where you record every sale.
The layout
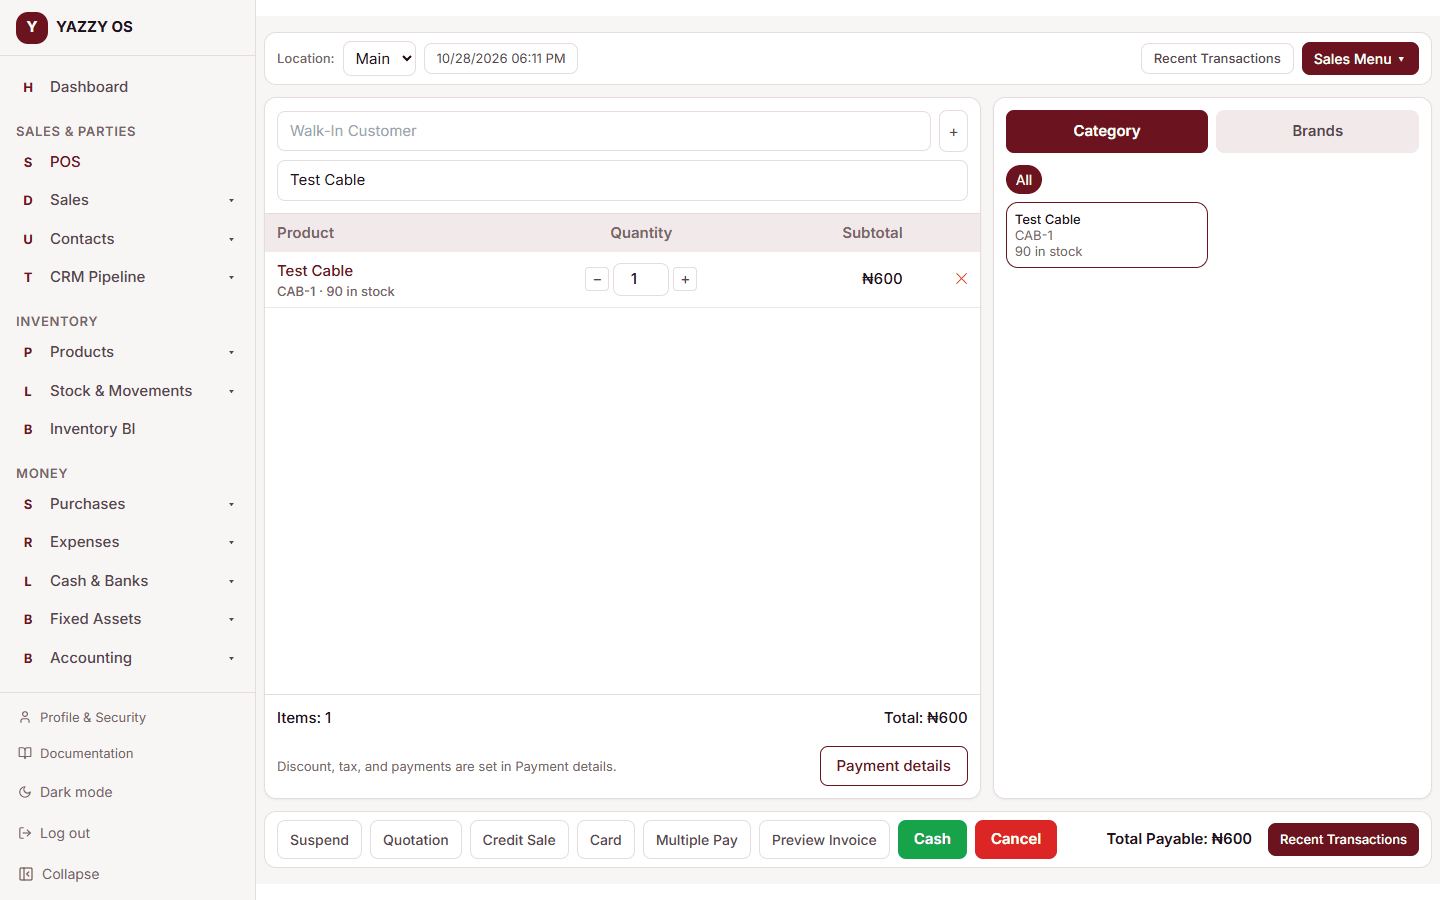
The screen has three parts:
Toolbar (top) — shows the branch you're selling from and the current date/time. If you work at more than one branch, switch which one you're selling for here. A Sales Menu button in the corner takes you to All Sales, Suspended Sales, Quotations, Returns, History, Discount Reviews, Discounts, and the Till.
Cart (left panel) — where the sale takes shape:
- A customer field at the top (leave it as "Walk-In Customer" for a sale with no named customer, or search for an existing one). Next to it, the + button adds a customer who isn't in the system yet — see Adding a new customer during a sale.
- A price group selector, if you use price groups.
- A product search box — type a name or SKU, or scan a barcode.
- The cart table itself: each line shows the product, quantity (with +/− buttons), and its subtotal. Select a product's name in the cart to add a per-line discount — or, if you've been given the right to change prices, its unit price too. See Changing a line's price.
- The item count and total at the bottom, with a Payment details button. The discount, tax, shipping, notes, salesperson, campaign code, layaway and payments are all set in the Payment window, so the cart keeps its room.
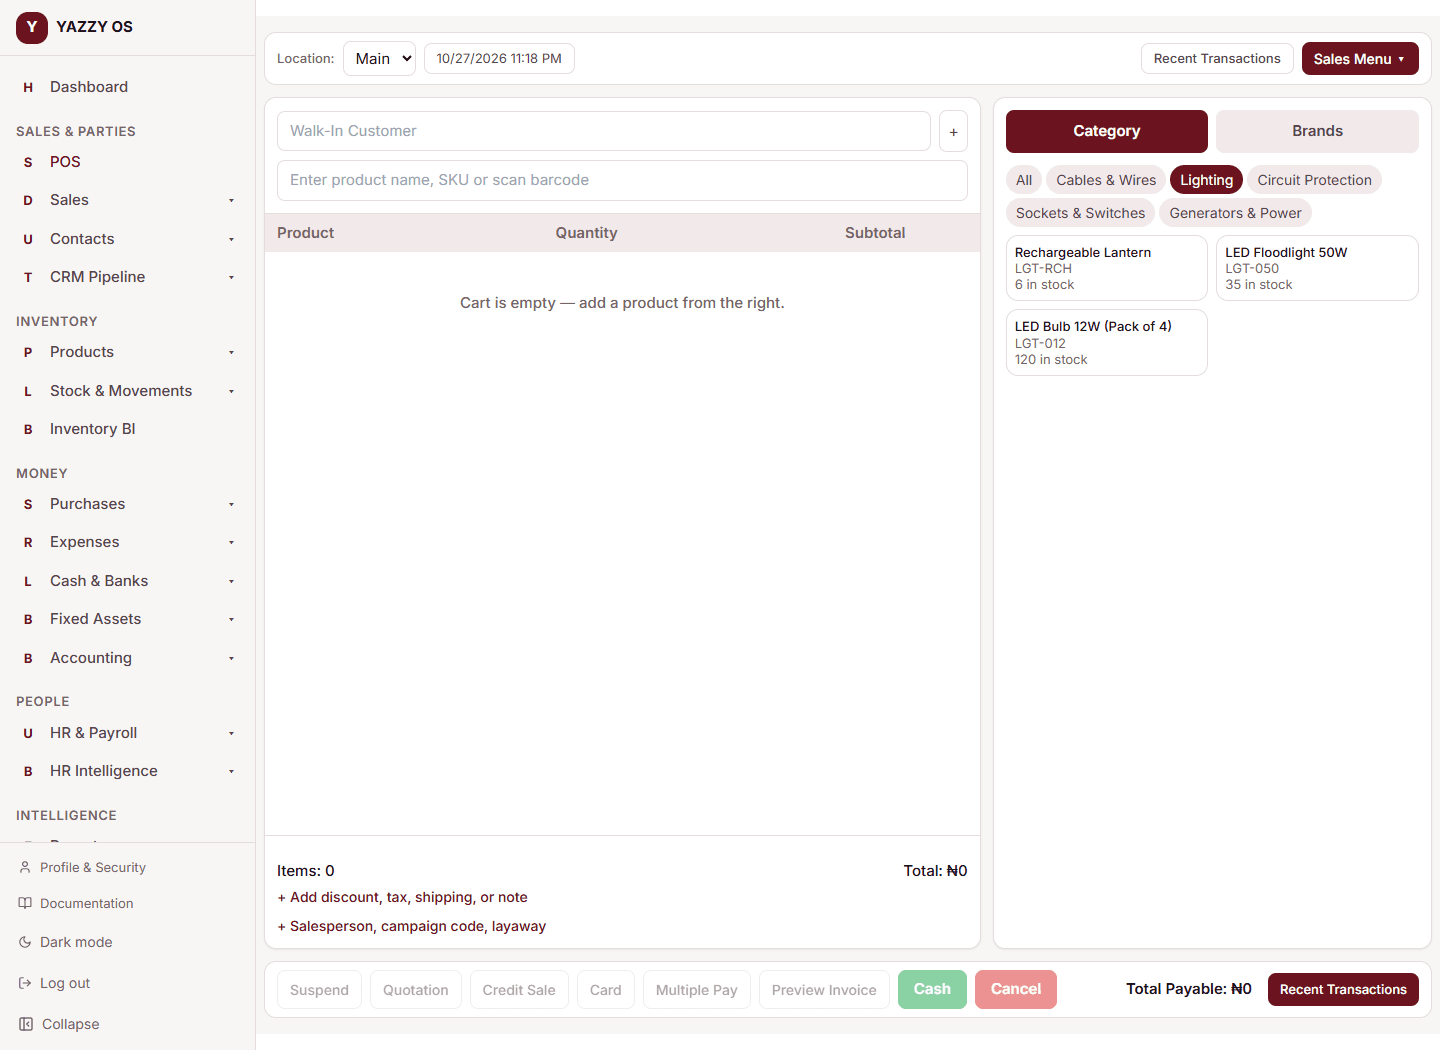
Product browser (right panel) — browse what you sell by Category or Brand, or just use the search box on the left. Select any product to add it to the cart.
Adding a new customer during a sale
If the customer isn't in the system yet, you don't have to leave the till. Select the + next to the customer field.
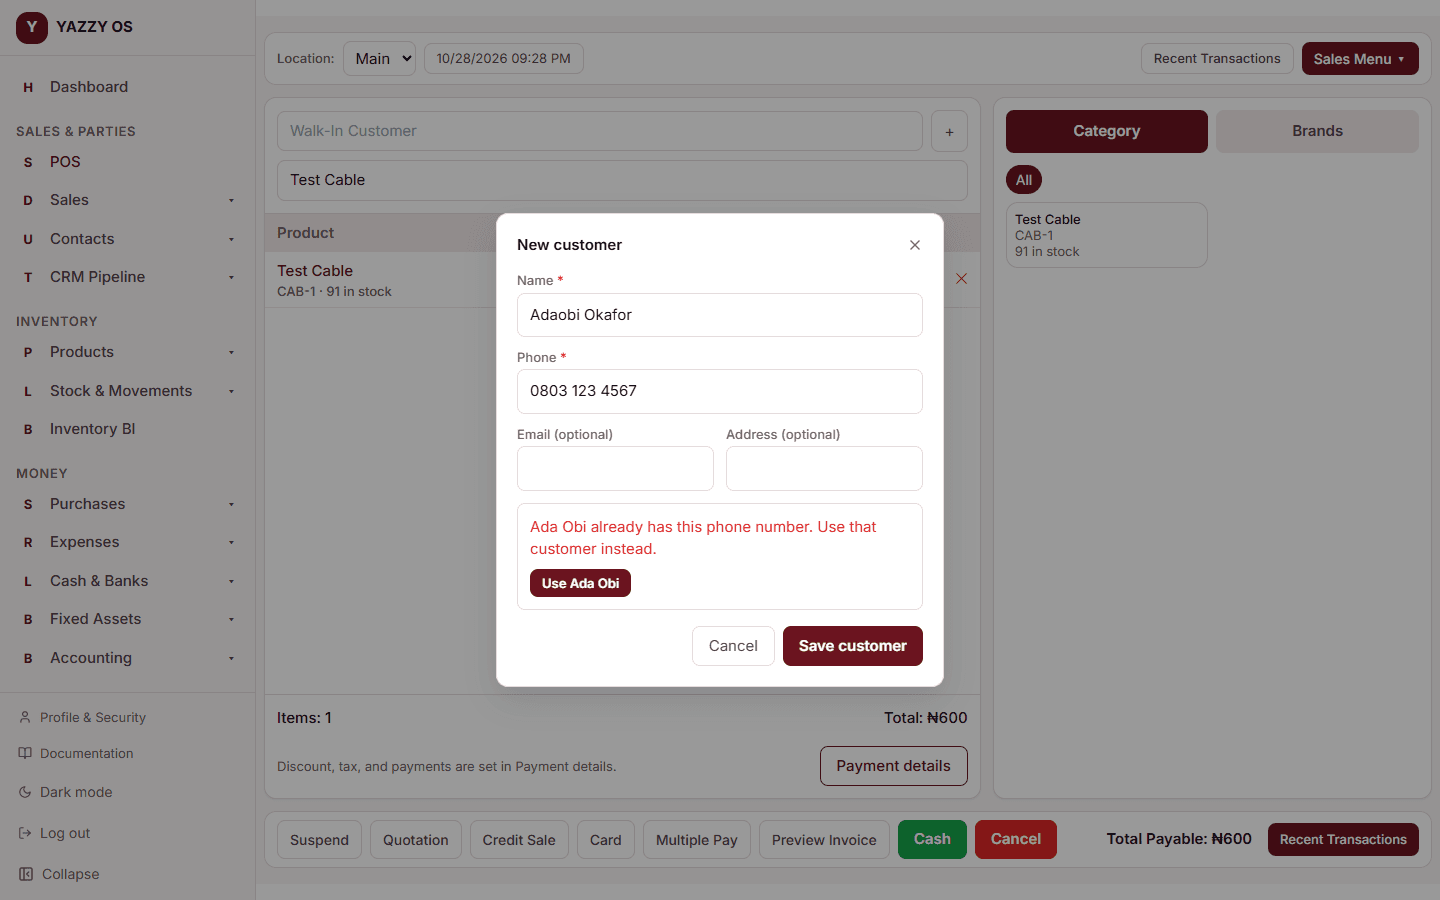
- Type the customer's Name and Phone — both are required. Email and Address are optional.
- Select Save customer.
The customer is saved in the branch you're selling from and is attached to the sale straight away. Your cart is untouched. Anything you'd already typed in the customer box is carried into the Name field.
One phone number, one customer. If that number already belongs to a customer, the window tells you who ("Ada Obi already has this phone number") and offers a Use Ada Obi button, so the same person is never added twice. Numbers are compared however they're written: 0803 123 4567, 0803-123-4567, +234 803 123 4567 and 2348031234567 are all the same number.
If something else stops the customer being saved — for example no branch is chosen — the window says exactly what to fix.
On the Desktop app the + needs a connection (it checks the number against your whole customer list), so it is greyed out with a hint while you're working offline. Add the customer when you're back online, or sell to Walk-In Customer for now.
Changing a line's price
If you've been given the Edit line subtotal / price permission, the Subtotal in each cart row is a box you can click. Type the amount you've agreed with the customer and press Enter; the unit price is worked out for you. This works exactly like the Subtotal on the Sales pages.
- A small edited tag shows beside any line whose price you've changed.
- The agreed price stays if you change the quantity or scan the same item again — the line keeps its unit price and the subtotal follows the quantity.
- If the line had a percentage discount, it becomes its naira value, so the number you typed is exactly what's charged.
Without the permission, the Subtotal and the Unit Price in the line window are shown but can't be changed, and the system also refuses to save a sale priced differently from the system price, so the screen can't be worked around. The owner decides who gets this right — see Roles and permissions.
The Payment window
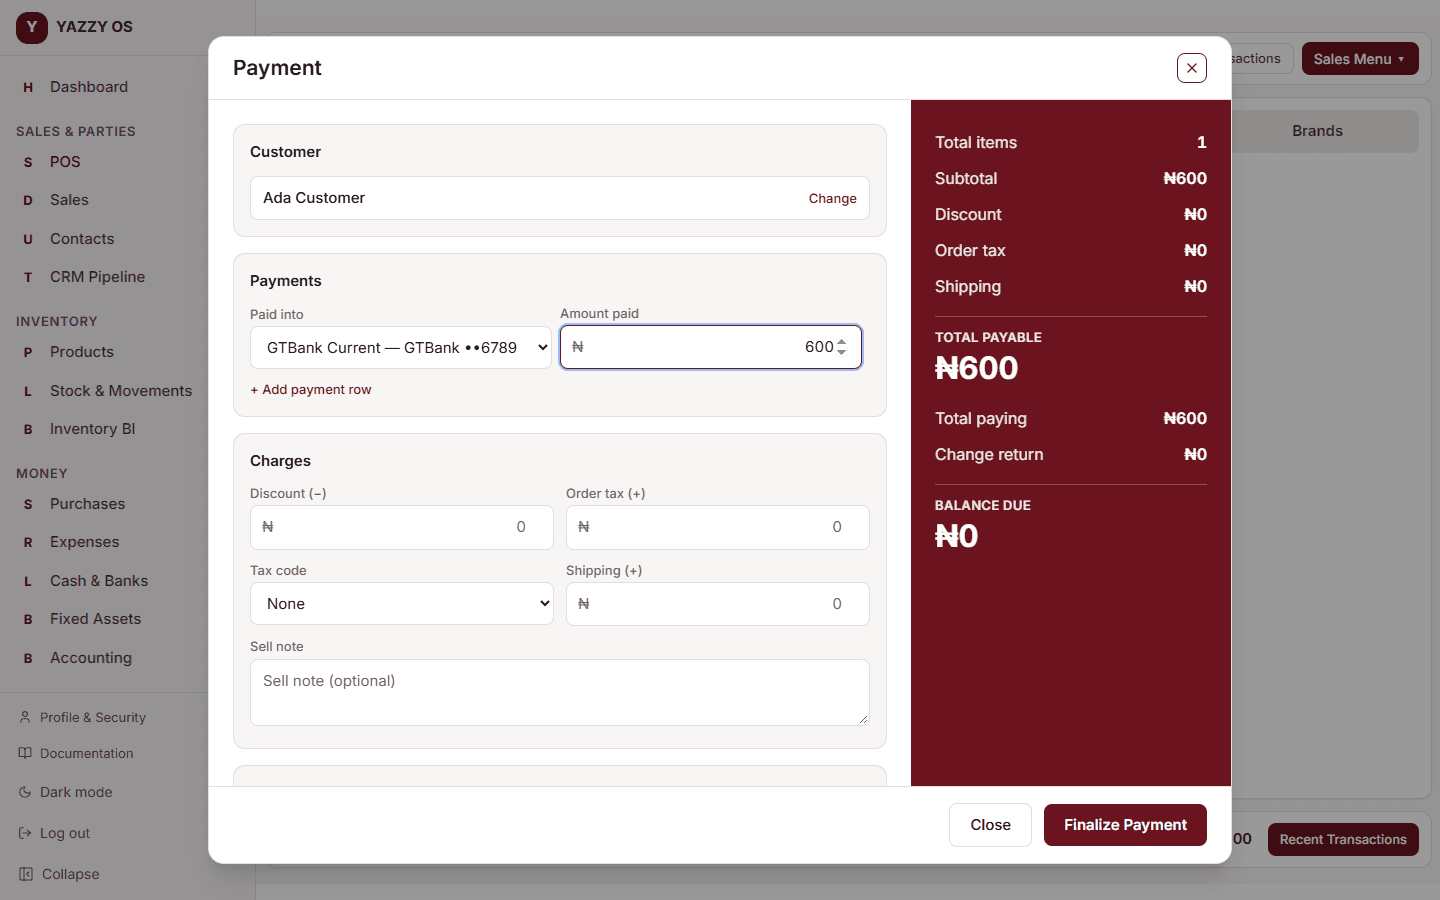
Select Payment details (or Multiple Pay) to open the Payment window. Everything about how the sale is paid and what it includes lives here, so the till stays clear.
Left side
- Customer — see who the sale is for, or search for one. A sale that isn't paid in full needs a customer; the window turns the card red and tells you.
- Payments — choose Paid into (Cash, Card, or one of your bank accounts) and type the Amount paid. It starts filled in with the full total, so a normal sale is one click. Need to split it — say part cash, part transfer? Select + Add payment row and give each row its own account.
- Charges — discount, order tax (with a tax code), shipping and a sell note.
- Sale details — salesperson, campaign code, and (if your workspace uses them) sale date and pay term.
- Layaway — tick it for a deposit-and-balance sale. See Layaway and deposit sales.
Right side (the summary) — updates as you type: Total payable, Total paying, Change return (if the customer hands over more than the total) and Balance due (if they pay less).
The Close and Finalize buttons are always at the bottom of the window — they never scroll out of sight. When part of the sale is unpaid, the button changes to Finalize as credit sale, and it stays unavailable until a customer is attached.
Paying into a bank account
Choosing a bank account under Paid into records the money as already in that bank (a transfer), and your Cash & Banks balance for that account goes up straight away. Cash and Card work as they always have: they're held in Undeposited Funds until you record a deposit. Bank accounts only appear if they've been added under Cash & Banks.
The bottom action bar
Once you have items in the cart, this bar is where you finish the sale:
- Suspend — pause this sale and free up the till (see Draft sales and quotations)
- Quotation — save this as a price estimate instead of a sale
- Credit Sale — complete the sale without collecting payment now (see Recording a credit sale)
- Card, Cash — complete the sale with that payment method
- Multiple Pay (F3) — opens the Payment window, the same one Payment details opens
- Preview Invoice — see what the receipt will look like before you finish
- Cancel — clear the cart and start over
The total the customer owes is always shown at the bottom right, next to a shortcut back to Recent Transactions.
Every item added to the cart is checked against what's actually in stock at your selected branch — see Understanding stock levels across branches.
Choosing a unit, an option, or a kit
- Two units (carton and pack): change the unit box under the item's name — the price follows. See Sell in cartons, packs or pieces.
- Product with options (size, colour): select the product and pick the option from the list, or scan the option's barcode. See Selling products with options.
- Kit (compound product): add it like any item; its parts leave stock. See Compound products.